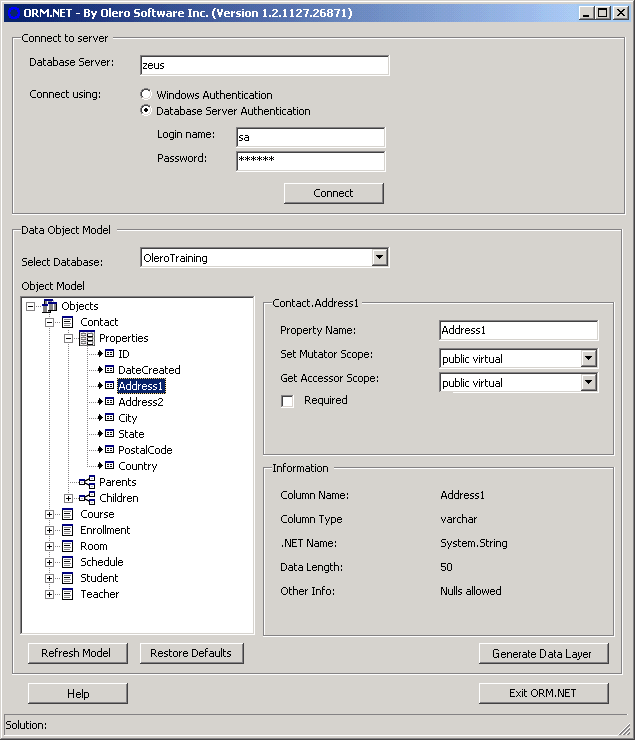
Once you have supplied the correct SQL database connection information an object model representing your schema is displayed in the ORM.NET Object Browser window. A fully implemented .NET based data layer will be generated based on the schema and object mapping you make within the Object Browser.
ORM.NET allows developers control over how the resulting data layer will be implemented. For each Object (table), Property (column) and Parent or Child relationship defined within the object model there are specific settings to control:
how the object or property will be named,
the level of access (scope),
rules on how the object must be created
whether a specific object property is read-only, or even visible
The most common defaults are automatically set based on the database schema definitions to allow you to immediately generate a Data Layer without making any modifications to the object model.
Expanding a specific table object such as Contact from the sample OleroTraining database will show the Properties (columns) and Parent/Children relationships (if any) defined for that object. Settings available for each element are displayed on the right-side of the tree-view pane.
NOTE: Tables are displayed as Objects and each column within the table are displayed as Properties. SQL relationships are represented as Parent or Children of the expanded Root object within the tree view.

In addition, to modifying the settings for objects, properties and Parent/Child objects you can take the following actions within the ORM.NET Object Browser.
Changes can be made at any time during the development process to either the underlying database schema. In order to view those changes within the ORM.NET Object Browser you must refresh the object model by clicking the Refresh Model button.
As you make changes to the object properties they are automatically saved for that database. If you want to reset your changes to restore the defaults that were originally set when the database was first loaded by ORM.NET click the Restore Defaults button.
IMPORTANT: Be aware that these changes will affect any other developers who are working against the same schema. You may also need to make changes to your application if you change alias names which have been referenced.
Once you have made any settings and are satisfied with the object model based on your database click the Generate Data Layer button to create a .NET project with the necessary class files and templates.
Whenever you click the Exit button or connect to another database you are prompted to Save Customizations. Clicking Yes will save all customizations to file, The customizations file is saved under the /Schemas directory under the path where you installed ORM.NET. The name of the file will be GUID.xml where GUID will be the same identifier as the value in the DatabaseGUID column of the _ORM_ table which is created when your first connect to the database.
To learn more about settings for the different elements the mapped object model refer to: