The Employee Viewer application is a Windows form application which is intended to show the following techniques when using ORM.NET.
Customize the objects and properties which map to the database schema using the ORM.NET object browser.
Retrieve a collection of related objects using the FetchPath object
Display data that is the result of a self-joining table
Bind data to basic Windows controls such as Text, List, Combo and Picture boxes on a Windows form.
Customize and extend the generated business objects to create new properties and override existing ones.
There are two main sections
Refer to the Creating Employee Viewer Application to learn the customizations that were applied to the Data Object Model. Some of the customizations in this section are also used by the Northwind Orders application.
Refer to Integrating a new Windows form project to see the steps taken so that the new project could use the generated Data Access Layer
Refer to the Employee Viewer Code Examples to see an explanation of the code used to create the application.
You can see other examples and learn more about the following code examples by referring to the sections Data Binding and Working with SQL Data Types
For a basic walk through refer to the Use ORM.NET in Six Simple Steps in the Quick Start section.
1. Login to the server you installed the NorthWind database. Select this database and click the Schema tab to view the Tables, Columns and Relationships that make up this database.
2. Select the General tab change the Project name space to Northwind. Select the language you want ORM.NET to generate the Data Layer with.

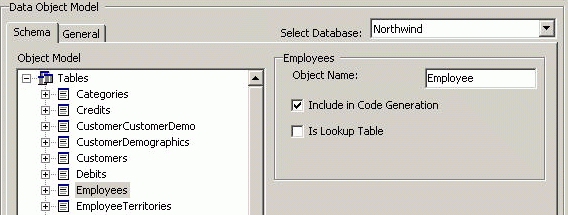
2. Select the Employee table under the Schema tab. In the right pane change the default name Employees to Employee. This will cause the object class name that is generated to use this name instead of the default. Your new object name should like this.

Changing this and the other table names to use singular object names will make it easier to follow and understand the code within the application.
3. Repeat step 2 to change the following table object names.
Change Customers to Customer
Change Orders to Order
Change OrderDetails to OrderDetail
Change Product to Product
Change Shippers to Shipper
4. Click on the Products table and check the Is Lookup Table option. Do the same thing for the Shippers table as well. By defining these Lookup object we can retrieve and then cache the data within the application.

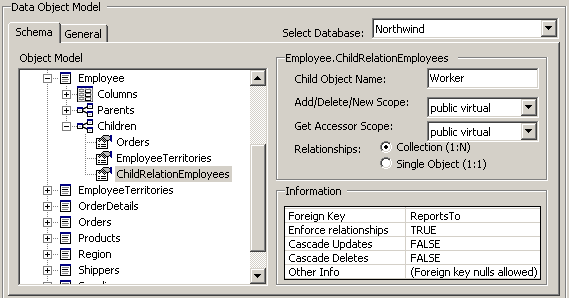
4. Under the Employees table expand the Children tree item. Rename the default relationship name ChildRelationEmployees to Worker. Since the Employee table has self-referencing relationship we can view which people a selected Employee manages. Each employee has a ReportsTo column which determines who the Employee works for. By changing the Parent relationship to we can also determine which employees a person manages and display this within the application.

5. Expand the Children node under the Customers table and change the Child Object Name Orders to Order. Expand the Children node of Orders and change the Child Object Name OrderDetails to OrderDetail . (Used by NorthWind Viewer Sample Application)
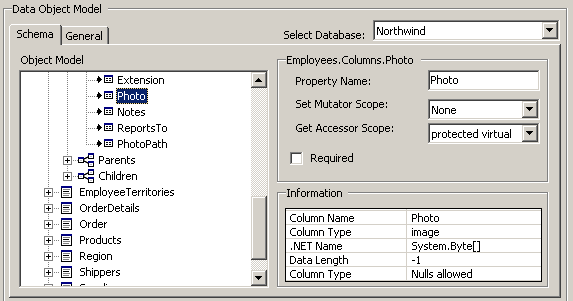
By default, ORM.NET creates a mapping between all column names with a Property of the same name. In addition, all of these properties have Set Mutator and Get Accessor set to have Public virtual scope. In this application we want to prevent the Photo property from being modified. To prevent this, we can set the Set Mutator scope to None. This will ensure that a Set method is not generated when the ORM generates the Data Layer. In addition, we want to override the Get Property so that we can correctly display the image contained within this column on the form. We will set the Get Accessor scope top protected virtual as shown below.

9. We can now click the Generate Data Layer button to create the class files and templates which will make up our Data Access Layer.
10. Select the folder you wish to have the generated solution and projects to be saved.
11. Change the name of the solution to EmployeeViewer.sln
The following steps are required to create a new Windows project which will use the Northwind Data Access Layer we generated above.
1. Open the solution by clicking the solution link within the ORM.NET Output Window
2. You will notice a console project named Test App as well as the new data access layer project named Northwindbiz
3. Add a new Windows Project to this solution called EmployeeViewer
4. Drag the App.Config file from the TestApp project to the new EmployeeViewer project.
5. Remove the TestApp project from the solution. This project will not be included in this solution when generating the Data Layer in the future.
6. Add a Project reference for the NorthWindBiz project to the EmployeeViewer project by right-clicking the Add a Reference menu item from the EmployeeViewer project.
7. From the EmployeeViewer project right click on the project and select Add Reference. Click the Browse button and select the OrmLib.dll assembly which was placed directly under the NorthwindBiz directory.
8 . Right Click the EmployeeViewer Project and select Set as Startup Project
9. Add the following Imports statements to the top of the form
Imports Northwind
Imports OrmLib
10. Compile the EmployeeViewer solution by typing Ctrl-Shift-B
We can now begin adding controls to the form!
When the Employee Viewer application starts a drop down list of Employees is displayed . Since no QueryCriteria was applied, the GetEmployeeCollection method will return all the Employees and their related Territory information. After the collection is retrieved the collection of objects will be sorted by the DateHired column in Descending order.
employees = data.GetEmployeeCollection( FetchPath.Employee.EmployeeTerritories.Territories )
employees.SortByHireDate( SortDirection.Descending )
Next, we will bind the employees collection to the ComboBoxEmployees at the top of the form.
' Bind the employees collection to a Combo Box
ComboBoxEmployees.DataSource = employees
' Use the custom Property called FullName for display
ComboBoxEmployees.DisplayMember = "EmployeeName"
The DisplayMember property uses a custom property that was added to the Employee class so that we can display the FirstName and LastName together. The customization made to the Employee class is shown below. Since these classes are only generated one-time and any customizations made them will not be lost if you regenerate the data object model after making more customizations.
Public ReadOnly Property FullName()
Get
Return (MyBase.FirstName + " " + MyBase.LastName)
End Get
End Property
A set of Text Box controls are used to display some details about the selected employee. We can bind these controls to employees collection to view the column data.
TextBoxHireDate.DataBindings.Add("Text", employees, "HireDate")
In order to display the image stored in the column Photo we must override the default Photo Property as shown below. Click here to see the customizations that were made to this Property within the ORM.NET object browser prior to generating the Data Layer. We also need to add a reference to the System.Drawing assembly within the Employee class.
imports System.Drawing
Public Shadows ReadOnly Property Photo()
Get
If MyBase.Get_Photo().IsNull Then
Return New Bitmap(1, 1)
Else
Dim ms As New MemoryStream(MyBase.Get_Photo().Value, 78, MyBase.Get_Photo().Value.Length() - 78)
Try
Return New Bitmap(Image.FromStream(ms), 152, 192)
Catch ex As Exception
System.Diagnostics.Debug.WriteLine(ex)
Return New Bitmap(1, 1)
End Try
End If
End Get
End Property
Once we have made this change we can easily bind the property to the PictureBox control.
PictureBoxPhoto.DataBindings.Add("Image", employees, "Photo")
'Bind the Child relationship (self join) to display the employees this person manages.
ListBoxWorkers.DataSource = employees
ListBoxWorkers.DisplayMember = "Workers.FullName"
To make working with the data in the Territories easier from the employees collection we can add another Property to the Employee class to return a collection of related Territories for each Employee.
Public ReadOnly Property Territories() As TerritoriesCollection
Get
Dim collection As New TerritoriesCollection()
Dim et As EmployeeTerritories
For Each et In Me.EmployeeTerritoriess
collection.Add(et.Territories)
Next
Return collection
End Get
End Property
Once this is complete we can bind the data to the Combo Box in order to display the TerritoryDescription column data from the Territories table using standard data binding syntax.
' Display the Territory Description information for each Employee
ComboBoxTerritories.DataSource = employees
ComboBoxTerritories.DisplayMember = "Territories.TerritoryDescription"
For information about applying templates to topics, press F1.